Worlber PG Inventory: An Open-Source Tool for PostgreSQL DB Inventory


1-introducing PG Inventory
PG Inventory was built from real-world pain.
Many times, when stepping into a new environment, the first challenge is simple:
Which database belongs to which application?
Which environment is this instance part of?
What is running where?
Most teams rely on Excel sheets to track this. Those sheets are shared across engineers, updated manually, and often not synchronized. Sometimes someone forgets to send the latest version. Sometimes the information is outdated. And sometimes human error leads to incorrect data.
I’ve faced situations where wrong inventory information caused extended downtime. That’s unacceptable.
That’s why we built Worlber PG Inventory.
Our goal is to provide a simple, focused, open-source tool for the PostgreSQL community — especially PostgreSQL DBAs — to track environments properly without relying on spreadsheets.
It is:
· Fully open source
· Free to use
· Built for DBAs
· Designed to be simple and easy to navigate
· Focused on clarity, not complexity
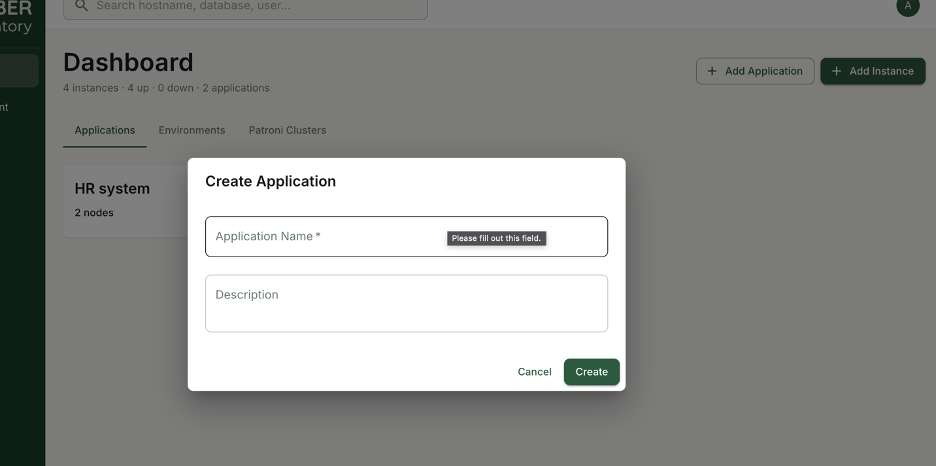
When you log in, you immediately define applications. Just the application name is enough to associate databases and instances correctly. This creates a clear mapping between PostgreSQL instances, environments, and the applications that depend on them.
No Excel chaos.
No version confusion.
No manual tracking errors.
Just structured, reliable PostgreSQL inventory management — built by DBAs, for DBAs.
We made the process straightforward.
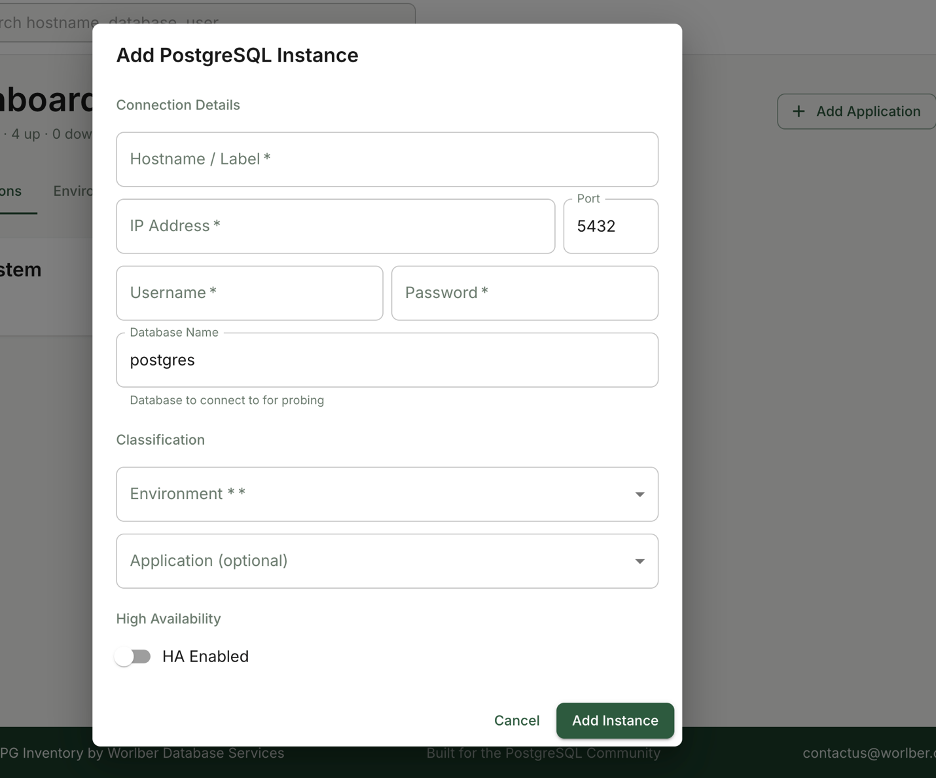
You simply provide:
- PostgreSQL connection details
- Credentials with minimum required privileges to query system information and basic performance metrics
- The associated application
- The environment (Dev, QA, Pre-Prod, Prod, etc.)
- The Patroni cluster (if the node is part of HA)
Security was a priority from day one.
All credentials are stored encrypted — not plain text — to ensure safe handling of access data.
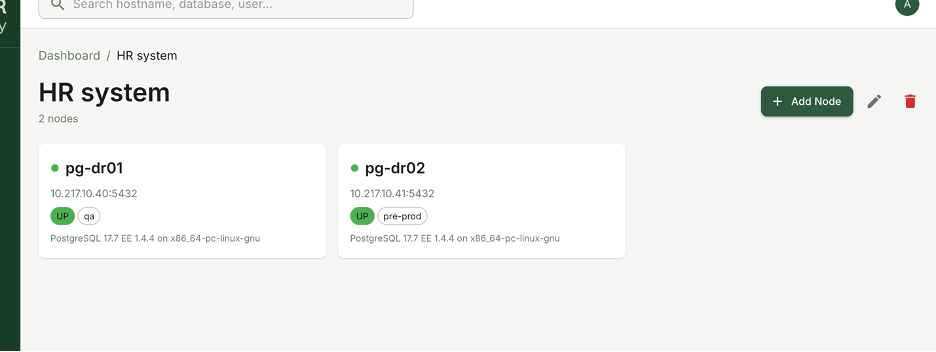
Once added, the node becomes part of a structured inventory where you can clearly see:
- Which application it serves
- Which environment it belongs to
- Whether it is standalone or part of a Patroni cluster
The goal is simple: eliminate ambiguity.
No guessing which server belongs where.
No digging through documents.
No outdated spreadsheets.
Just a clean, centralized PostgreSQL inventory designed specifically for DBAs who need clarity fast.
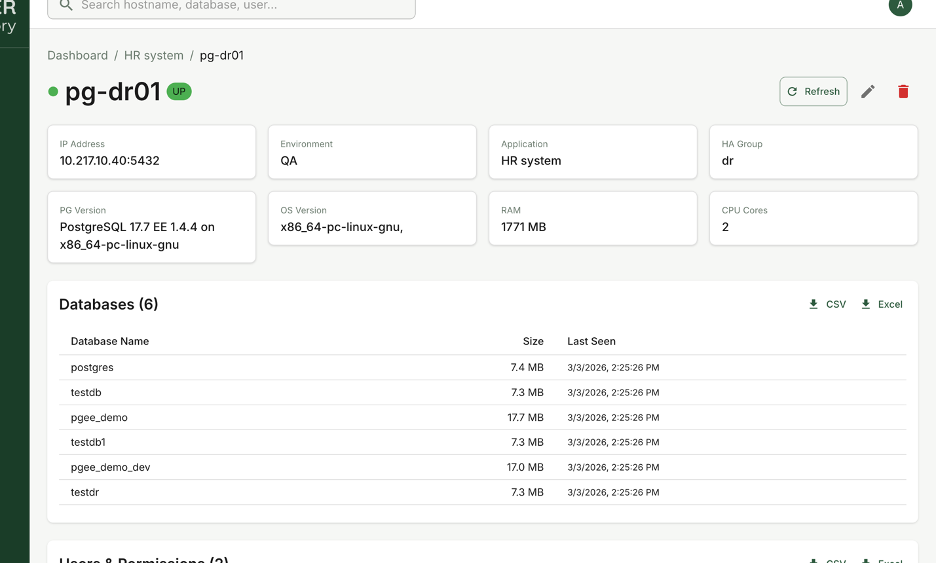
Inside each PostgreSQL node, you get full visibility into its details.
For every instance, you can view:
· Operating system information
· CPU and RAM specifications
· Resource usage metrics
· Current instance status
· Complete database list
· User and role list
This is not just static metadata. It gives you operational awareness.
You can also export database and user information when needed — useful for audits, documentation, migrations, or compliance reporting.
The idea is simple:
When you open a node, you immediately understand what it is, what it runs, and who has access to it.
No SSH digging.
No manual querying.
No scattered documentation.
Everything centralized, structured, and built for PostgreSQL DBAs who need fast clarity.
2- How to install pg Inventory
Now the important question: how do you install it?
To make deployment simple and fully cross-platform, we provide PG Inventory as a Docker container.
Installation is straightforward and can be completed in six steps.
Step 1: Install Docker
Docker installation is simple and well documented. I won’t repeat the process here.
Follow the official guide:
https://www.docker.com/get-started/
Once Docker is installed and running, you’re ready to proceed with the next steps.
Step 2: Create a Project Directory
Create a dedicated folder for PG Inventory:
mkdir pg-inventory && cd pg-inventoryStep 3: Create the .env File
Create an environment configuration file:
cat > .env << 'EOF'
DJANGO_SECRET_KEY=change-me-to-a-random-secret-key
DJANGO_SETTINGS_MODULE=pg_inventory.settings.development
DJANGO_DEBUG=True
DJANGO_ALLOWED_HOSTS=localhost,127.0.0.1
DATABASE_URL=postgres://pguser:pgpass@db:5432/pg_inventory
POSTGRES_USER=pguser
POSTGRES_PASSWORD=pgpass
POSTGRES_DB=pg_inventory
REDIS_URL=redis://redis:6379/0
AES_ENCRYPTION_KEY=6uAf0QteKNQWmx32JTvzwmWnMsNOxEdGF9HV46juvEA=
DJANGO_SUPERUSER_USERNAME=admin
DJANGO_SUPERUSER_PASSWORD=admin
DJANGO_SUPERUSER_EMAIL=admin@worlber.com
EOF
This file
Step 4: Create docker-compose.yml
Create the Docker Compose configuration:
services:
db:
image: postgres:16-alpine
environment:
POSTGRES_USER: ${POSTGRES_USER:-pguser}
POSTGRES_PASSWORD: ${POSTGRES_PASSWORD:-pgpass}
POSTGRES_DB: ${POSTGRES_DB:-pg_inventory}
volumes:
- postgres_data:/var/lib/postgresql/data
ports:
- "5432:5432"
healthcheck:
test: ["CMD-SHELL", "pg_isready -U pguser"]
interval: 5s
timeout: 5s
retries: 5
redis:
image: redis:7-alpine
ports:
- "6379:6379"
healthcheck:
test: ["CMD", "redis-cli", "ping"]
interval: 5s
timeout: 5s
retries: 5
backend:
image: worlber64/pginventory:backend-v1.0.0
command: >
sh -c "python manage.py makemigrations &&
python manage.py migrate &&
python manage.py create_superuser_if_not_exists &&
python manage.py runserver 0.0.0.0:8000"
ports:
- "8000:8000"
env_file:
- .env
depends_on:
db:
condition: service_healthy
redis:
condition: service_healthy
celery_worker:
image: worlber64/pginventory:celery-worker-v1.0.0
command: celery -A pg_inventory worker -l info
env_file:
- .env
depends_on:
db:
condition: service_healthy
redis:
condition: service_healthy
celery_beat:
image: worlber64/pginventory:celery-beat-v1.0.0
command: celery -A pg_inventory beat -l info --scheduler django_celery_beat.schedulers:DatabaseScheduler
env_file:
- .env
depends_on:
backend:
condition: service_started
db:
condition: service_healthy
redis:
condition: service_healthy
frontend:
image: worlber64/pginventory:frontend-v1.0.0
ports:
- "3000:3000"
depends_on:
- backend
volumes:
postgres_data:
Step 5: Pull Images and Start Services
Download images and start the application:
docker compose pulldocker compose up -dThe system will initialize the database, run migrations, create the superuser, and start all services.
Step 6: Access the Application
Wait approximately 30 seconds for all containers to become healthy.
Then open:
· Frontend: http://localhost:3000
· Backend API: http://localhost:8000/api/
· Django Admin: http://localhost:8000/admin/
Default login:
Username: adminPassword: admin(Recommended: change credentials immediately in production.)
That’s it.
Cross-platform.
Isolated.
No manual dependency installation.
PG Inventory runs entirely inside Docker and is ready for PostgreSQL inventory management in minutes.
We hope PG Inventory proves useful for your PostgreSQL environments.
If you encounter any issues, have suggestions, or would like to contribute to the project, please visit the repository below and open an issue or submit a pull request.
Community contribution is welcome — improvements, feedback, and enhancements are highly appreciated.